The Best Fluffy Pancakes recipe you will fall in love with. Full of tips and tricks to help you make the best pancakes.
No-Bake Oreo Cheesecake
No-Bake Oreo Cheesecake: The Ultimate Indulgence Without an Oven
Have you ever craved a decadent dessert but dreaded the thought of turning on your oven? What if I told you that you could whip up a show-stopping cheesecake in under two hours—no baking required? Enter the irresistible No-Bake Oreo Cheesecake, a creamy, crunchy, and utterly satisfying treat that’s perfect for any occasion.
This dessert is a game-changer for fans of easy desserts and Oreo lovers alike. Whether you’re a seasoned baker or a kitchen novice, this recipe will quickly become your go-to for celebrations, potlucks, or cozy nights in. In this post, we’ll guide you through every step of making the perfect No-Bake Oreo Cheesecake, share expert tips, and reveal all the secrets for success.
Ingredients List
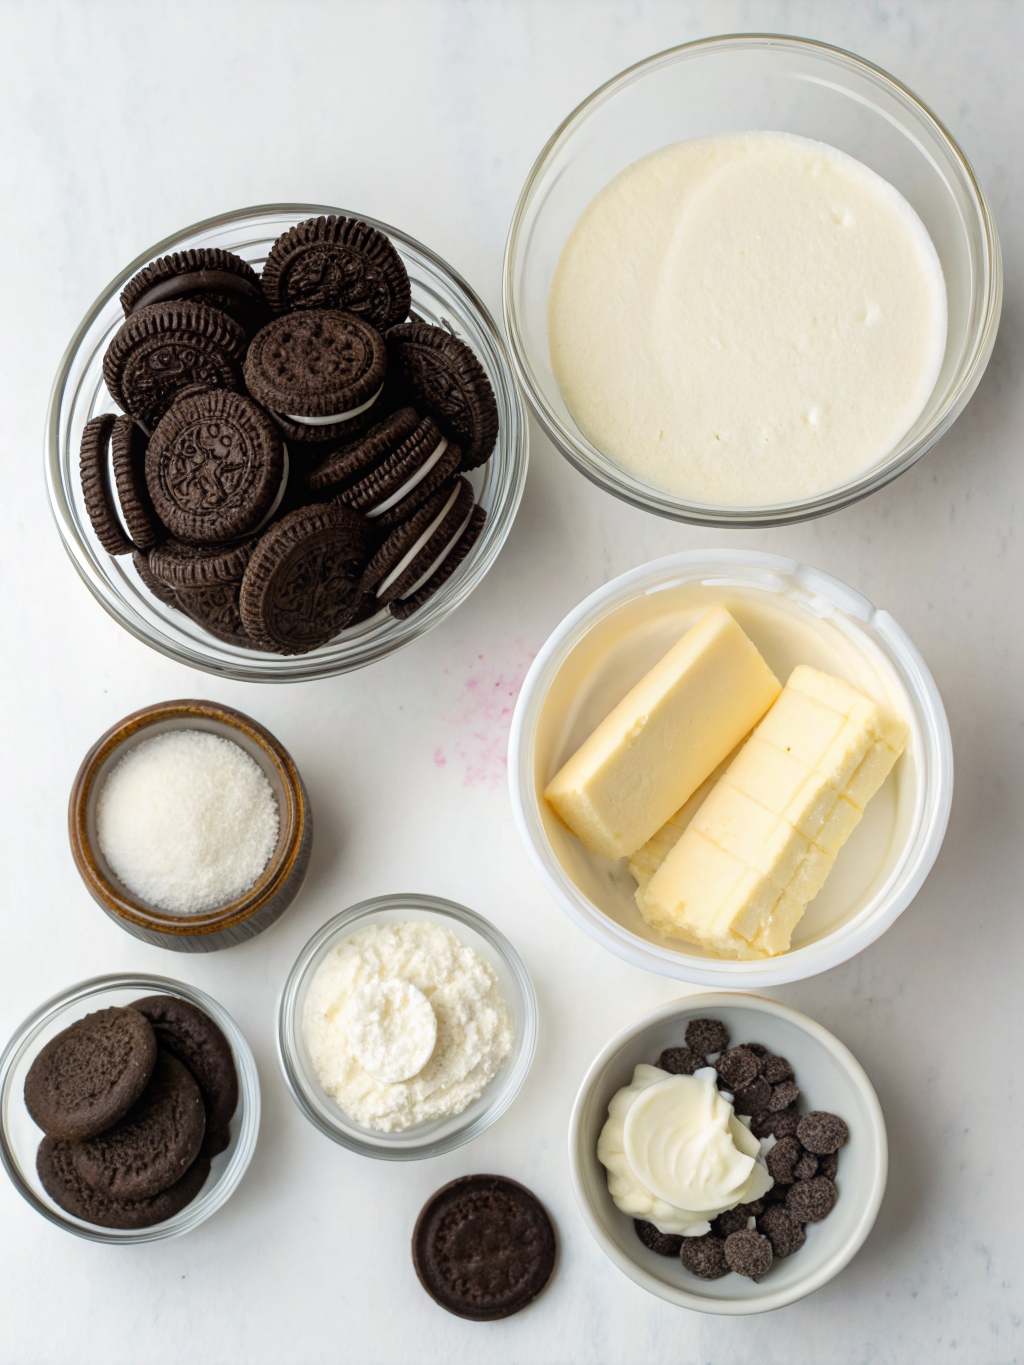
The magic of this No-Bake Oreo Cheesecake lies in its simple, pantry-friendly ingredients. Here’s what you’ll need:
- Oreo cookies (28–32 cookies) – For the crust and filling. Substitute with any chocolate sandwich cookie for a twist.
- Unsalted butter (1/2 cup, melted) – Binds the crust. Salted butter adds a savory note if preferred.
- Cream cheese (16 oz, softened) – The creamy base. Use full-fat for richness, or try Neufchâtel for less fat.
- Powdered sugar (1 cup) – Sweetens the filling. Swap with coconut sugar for a subtle caramel flavor.
- Heavy whipping cream (1 1/4 cups, cold) – Adds fluffiness. Coconut cream works for a dairy-free option.
- Vanilla extract (1 teaspoon) – Enhances flavor. Almond extract can add a unique twist.
- Pinch of salt – Balances sweetness. Optional but recommended.
- Extra Oreos and whipped cream – For topping and garnish.
Feel free to get creative—add a sprinkle of sea salt, a swirl of peanut butter, or even a handful of chocolate chips for extra indulgence.
Timing
One of the best features of this recipe is its speed and simplicity. Here’s a breakdown:
- Preparation time: 25 minutes
- Chilling time: 1 hour 30 minutes (minimum for best results)
- Total time: 1 hour 55 minutes
This means you’ll spend about 20% less time than most traditional baked cheesecakes, which often require over 2.5 hours including baking and cooling. It’s perfect for last-minute gatherings or when you need a quick, impressive dessert.
Step-by-Step Instructions
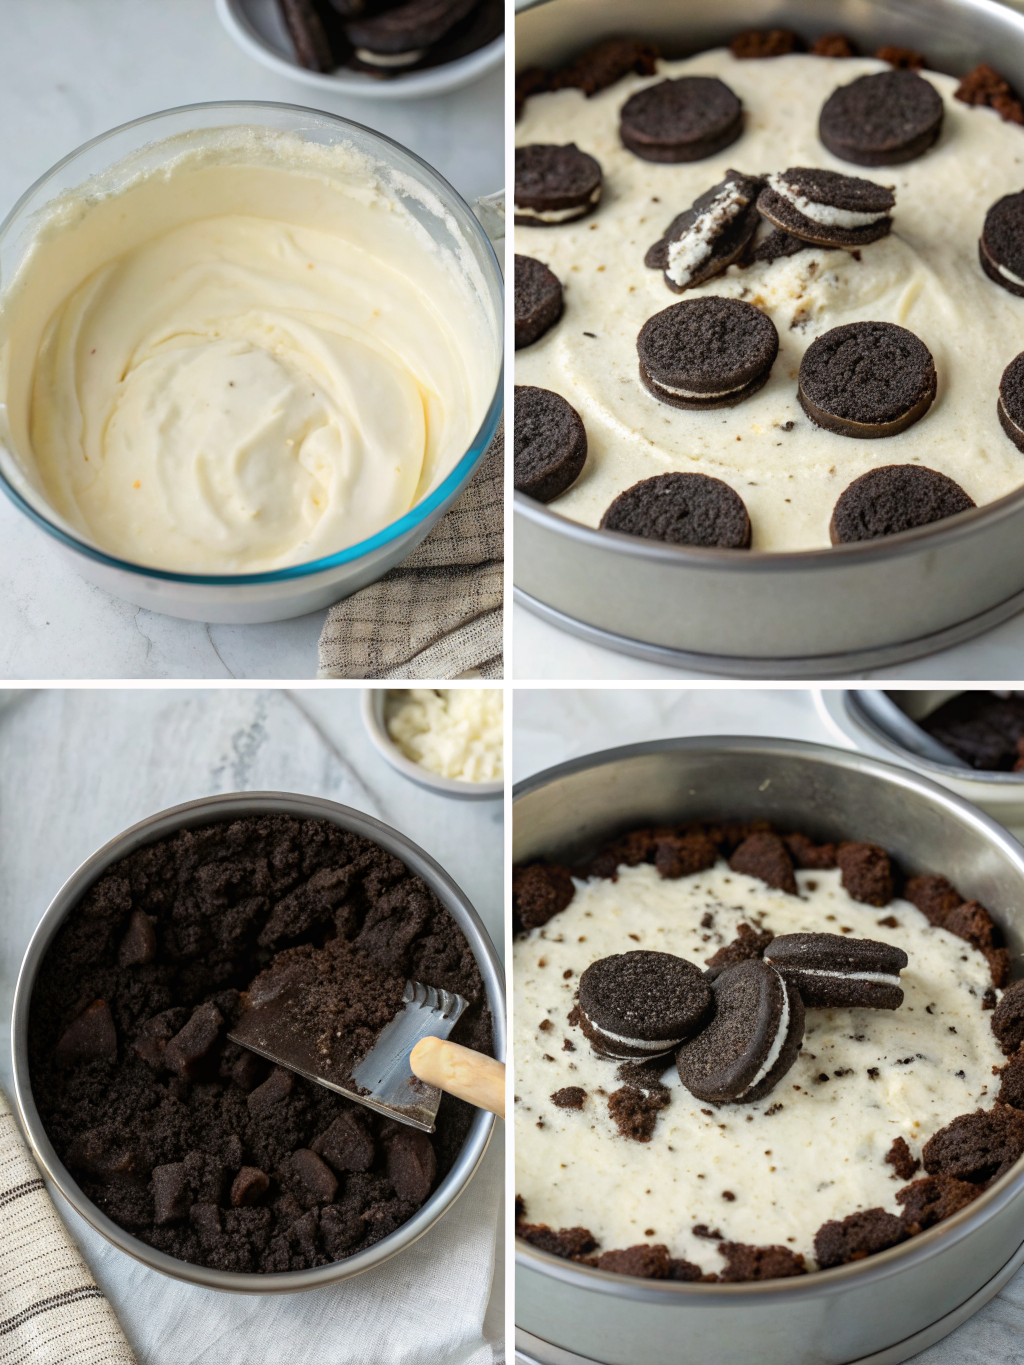
Step 1: Prepare the Oreo Crust
- Place 24 Oreo cookies (with filling) into a food processor. Pulse until you have fine crumbs.
- Pour in the melted butter and pulse again until the mixture resembles wet sand.
- Press the crumb mixture firmly into the bottom of a 9-inch springform pan, using the back of a spoon or a flat-bottomed glass. Chill in the refrigerator while you prepare the filling.
Tip: Line the pan with parchment for easy removal and cleaner slices.
Step 2: Whip the Cream
- In a large mixing bowl, beat the cold heavy whipping cream until stiff peaks form. Set aside.
Tip: For best results, chill your bowl and beaters beforehand.
Step 3: Make the Cheesecake Filling
- In another bowl, beat the softened cream cheese until smooth and creamy.
- Add powdered sugar, vanilla extract, and a pinch of salt. Mix until fully incorporated.
- Gently fold in the whipped cream until the mixture is light and fluffy.
- Crush 8 more Oreos into small pieces and fold them into the filling for extra crunch and flavor.
Tip: Don’t overmix after adding whipped cream—gentle folding keeps the filling airy.
Step 4: Assemble and Chill
- Spread the cheesecake filling evenly over the chilled crust.
- Smooth the top with a spatula and cover the pan with plastic wrap.
- Chill in the refrigerator for at least 90 minutes, or preferably overnight for best texture and flavor.
Step 5: Garnish and Serve
- Before serving, top with dollops of whipped cream, extra crushed Oreos, or a drizzle of chocolate sauce.
- Release the springform pan, slice, and enjoy!
Tip: For clean slices, use a sharp knife dipped in hot water and wiped dry between cuts.
Nutritional Information
Each serving (1/12th of the cheesecake) contains approximately:
- Calories: 410
- Fat: 28g
- Saturated Fat: 16g
- Carbohydrates: 38g
- Sugar: 26g
- Protein: 4g
- Fiber: 1g
- Sodium: 220mg
These values may vary depending on ingredient brands and substitutions. Compared to traditional baked cheesecakes, this version is slightly lighter in calories and fat, especially when using low-fat or dairy-free alternatives.
Healthier Alternatives for the Recipe
Looking to lighten things up? Try these modifications:
- Use low-fat or Neufchâtel cream cheese for a lighter filling.
- Swap Oreo cookies for chocolate graham crackers or gluten-free cookies for dietary needs.
- Replace heavy cream with coconut cream or a plant-based whipping cream for a vegan option.
- Reduce sugar by half or use a natural sweetener like stevia or monk fruit.
- For extra protein, add a scoop of vanilla protein powder to the filling.
These swaps ensure your cheesecake remains delicious while catering to various lifestyles, including gluten-free, dairy-free, and lower-sugar diets.
Serving Suggestions
This cheesecake is endlessly versatile. Serve it as a birthday treat, at a summer BBQ, or as an elegant dinner party dessert. For a playful touch, cut into bite-sized bars or layer in jars for individual parfaits.
Top with fresh berries, a dusting of cocoa powder, or even a drizzle of caramel for a personalized twist. Pair with a cup of espresso or a glass of cold milk for the ultimate indulgence.
Common Mistakes to Avoid
- Not chilling long enough: The cheesecake needs at least 90 minutes to set. Rushing this step leads to a runny filling.
- Overmixing the whipped cream: Folding too vigorously deflates the mixture, resulting in a dense, heavy texture.
- Using warm ingredients: Cream cheese and whipping cream must be cold for best results and structure.
- Forgetting to line the pan: This can make removing slices tricky and messy.
- Skipping the crust chill: A chilled crust holds together better and prevents sogginess.
Storing Tips for the Recipe
Store any leftover No-Bake Oreo Cheesecake in an airtight container in the refrigerator for up to five days. For longer storage, freeze individual slices wrapped tightly in plastic wrap and foil for up to two months.
When prepping ahead, you can make the crust and filling separately and assemble just before serving. Always refrigerate until ready to serve to maintain the best texture and flavor.
Conclusion
The No-Bake Oreo Cheesecake is the ultimate blend of convenience, flavor, and visual appeal. With its creamy filling, crunchy crust, and endless customization options, it’s no wonder this dessert is a favorite among Oreo recipes worldwide.
Ready to impress your friends and family? Try this recipe today, leave your feedback in the comments, and share your creative twists! Don’t forget to explore our other easy dessert ideas for more inspiration. Happy no-baking!
« `