
The Best Fluffy Pancakes recipe you will fall in love with. Full of tips and tricks to help you make the best pancakes.
Best Taco Soup Recipe
Have you ever wondered why some taco soups taste like a fiesta in a bowl while others fall flat? The secret lies in layering flavors and choosing the right ingredients to create a hearty, satisfying meal that brings the family together. This Taco Soup Recipe delivers bold Mexican flavors in under an hour, making it perfect for busy weeknights when you crave comfort food without the fuss.
Whether you’re a seasoned home cook or just starting your culinary journey, this recipe transforms simple pantry staples into an extraordinary Mexican soup that rivals any restaurant version. The beauty of this dish lies in its versatility—you can customize it to match your family’s preferences while maintaining that authentic taco taste everyone loves.
This comprehensive guide walks you through every step of creating the ultimate taco soup, from selecting ingredients to avoiding common mistakes. You’ll discover professional tips that elevate this simple recipe into something truly special, ensuring every spoonful bursts with flavor and satisfaction.
Ingredients List
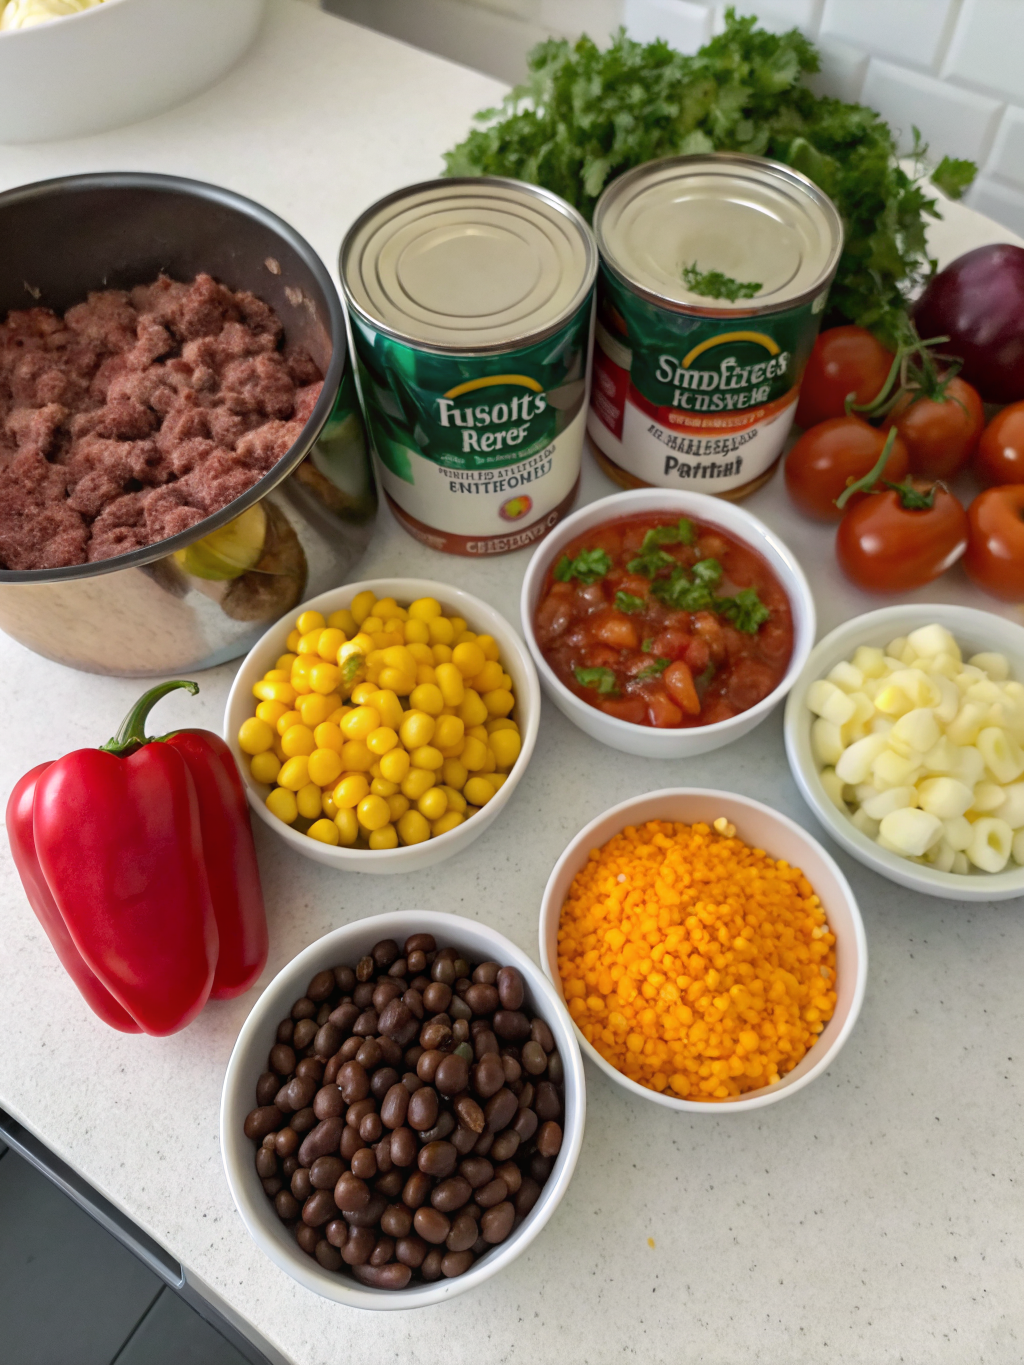
Gathering quality ingredients is the foundation of any exceptional dish. This Taco Soup Recipe uses readily available items that you likely already have in your pantry, making it both economical and convenient for last-minute meal planning.
- 1 pound ground beef (or ground turkey for a leaner option)
- 1 medium onion, diced (yellow or white onions work best)
- 3 cloves garlic, minced (fresh garlic provides superior flavor)
- 1 packet taco seasoning (or 2 tablespoons homemade blend)
- 1 can (15 oz) black beans, drained and rinsed (pinto beans make an excellent substitute)
- 1 can (15 oz) kidney beans, drained and rinsed
- 1 can (15 oz) corn, drained (frozen corn works equally well)
- 1 can (14.5 oz) diced tomatoes with juice
- 1 can (10 oz) diced tomatoes with green chilies (like Rotel)
- 1 can (8 oz) tomato sauce
- 2 cups beef broth (chicken or vegetable broth are suitable alternatives)
- 1 cup water
- Salt and pepper to taste
- Optional toppings: shredded cheese, sour cream, tortilla chips, avocado, cilantro, lime wedges
The ingredient substitutions offer flexibility without compromising the soup’s integrity. For vegetarians, replace ground beef with plant-based crumbles or additional beans. Fresh tomatoes can substitute canned varieties when in season, though canned tomatoes provide consistent flavor year-round.
Timing
Time management is crucial when preparing meals for hungry families. This recipe’s efficiency makes it ideal for those hectic evenings when time is limited but quality cannot be compromised.
Preparation Time: 10 minutes—This includes chopping onions, mincing garlic, and gathering your ingredients. Having everything ready before cooking (mise en place) streamlines the process significantly.
Cooking Time: 30 minutes—The active cooking phase involves browning meat, sautéing aromatics, and simmering the soup to meld flavors perfectly.
Total Time: 40 minutes—From start to finish, you’ll have a complete meal ready in less time than ordering takeout. This represents approximately 35% less time than traditional slow-cooked soup recipes while delivering comparable depth of flavor.
Step-by-Step Instructions
Step 1: Brown the Ground Beef
Heat a large pot or Dutch oven over medium-high heat. Add the ground beef, breaking it apart with a wooden spoon as it cooks. Continue cooking for 6-8 minutes until the meat is completely browned with no pink remaining. The Maillard reaction occurring during browning creates rich, savory flavors that form the soup’s flavor foundation.
Drain excess fat if necessary, leaving about one tablespoon in the pot to sauté the aromatics. This small amount of fat carries flavor compounds that water-based liquids cannot, enhancing the overall taste profile significantly.
Step 2: Sauté Aromatics
Add the diced onion to the pot with the browned beef. Cook for 3-4 minutes, stirring occasionally, until the onion becomes translucent and softens. The onion’s natural sugars will caramelize slightly, adding sweetness that balances the soup’s savory elements.
Add the minced garlic and cook for an additional 60 seconds, stirring constantly to prevent burning. Garlic releases its aromatic compounds quickly, and overcooking creates bitterness that can overpower other flavors.
Step 3: Add Seasoning and Spices
Sprinkle the taco seasoning over the beef and onion mixture. Stir thoroughly to coat everything evenly, cooking for about 1 minute. This technique, called « blooming » spices, activates their essential oils and intensifies their flavors dramatically compared to adding them later.
The brief cooking period allows the spices to toast slightly, developing complex flavor notes that raw seasonings simply cannot provide. You’ll notice the aroma intensifying—this signals the spices are ready for the liquid ingredients.
Step 4: Incorporate Canned Ingredients
Add both types of beans, corn, diced tomatoes, tomatoes with green chilies, and tomato sauce to the pot. Stir everything together, ensuring even distribution of ingredients throughout the mixture. Each component contributes unique flavors and textures that create the soup’s signature character.
The combination of different tomato products provides acidity, umami, and body. The green chilies add mild heat and brightness that distinguishes this soup from ordinary chili recipes.
Step 5: Add Liquids and Simmer
Pour in the beef broth and water, stirring to combine all ingredients thoroughly. Bring the mixture to a boil over high heat, then reduce to medium-low and maintain a gentle simmer. This gradual heating allows flavors to integrate seamlessly.
Simmer uncovered for 20-25 minutes, stirring occasionally to prevent sticking. The simmering process concentrates flavors as liquid reduces slightly, creating a rich, cohesive soup where individual ingredients harmonize beautifully. Taste and adjust seasoning with salt and pepper as needed.
Step 6: Final Adjustments
Before serving, taste the soup and make final seasoning adjustments. If you prefer more heat, add hot sauce, cayenne pepper, or additional diced jalapeños. For extra depth, a squeeze of fresh lime juice brightens all the flavors remarkably.
If the soup seems too thick, add more broth or water in small increments. Conversely, if it’s too thin, continue simmering uncovered for 5-10 additional minutes to reduce and thicken naturally.
Nutritional Information
Understanding the nutritional profile helps you make informed decisions about portion sizes and modifications. This Taco Soup Recipe provides substantial nutrition while remaining relatively moderate in calories, making it suitable for various dietary approaches.
Per Serving (based on 8 servings):
Calories: 285—This represents approximately 14% of a 2,000-calorie daily diet, making it a reasonable main course option.
Protein: 22g—The combination of ground beef and beans provides complete protein with all essential amino acids, supporting muscle maintenance and satiety.
Carbohydrates: 28g—Complex carbohydrates from beans and corn offer sustained energy without dramatic blood sugar spikes.
Dietary Fiber: 7g—This represents about 25% of the recommended daily fiber intake, promoting digestive health and prolonged fullness.
Fat: 9g—Primarily from the ground beef, with minimal saturated fat when using lean meat options.
Sodium: 890mg—While substantial, this can be reduced by using low-sodium broth and beans, plus homemade taco seasoning without added salt.
The soup also provides significant amounts of iron, potassium, vitamin C, and vitamin A. The diverse ingredient profile ensures you’re getting a wide spectrum of micronutrients that support overall health and wellness.
Healthier Alternatives for the Recipe
Modifying recipes to align with health goals doesn’t mean sacrificing flavor. These strategic substitutions maintain the soup’s delicious character while enhancing its nutritional profile for various dietary needs.
Lean Protein Options: Replace ground beef with 93% lean ground turkey or chicken to reduce fat content by approximately 40%. Plant-based alternatives like lentils or textured vegetable protein work excellently for vegetarian versions while boosting fiber content significantly.
Reduce Sodium: Use no-salt-added canned goods and low-sodium broth, then season to taste with your own salt. This approach can cut sodium content by 50% or more while maintaining full flavor control.
Increase Vegetables: Add diced bell peppers, zucchini, or spinach to boost vitamin content and fiber without adding significant calories. These additions increase volume, allowing for larger, more satisfying portions with better nutritional density.
Control Toppings: Traditional toppings like cheese and sour cream add calories and saturated fat. Consider Greek yogurt instead of sour cream for added protein, or use reduced-fat cheese sparingly for flavor without excessive calories.
Whole Grain Additions: Serve over quinoa or brown rice instead of with tortilla chips to add whole grains that provide sustained energy and additional fiber, creating a more balanced, complete meal.
Serving Suggestions
Presentation and accompaniments transform a simple soup into a memorable dining experience. These creative serving ideas help you customize the meal for different occasions and preferences.
Classic Toppings Bar: Set up a self-serve station with shredded cheddar cheese, sour cream, diced avocado, sliced jalapeños, chopped cilantro, lime wedges, and crushed tortilla chips. This interactive approach lets each person customize their bowl, making it particularly appealing for families with varying taste preferences.
Bread Bowls: Serve the soup in hollowed-out round bread loaves for an impressive presentation that eliminates the need for separate bread. The edible bowl adds rustic charm and makes cleanup easier while providing a satisfying textural contrast.
Cornbread Pairing: Sweet, crumbly cornbread complements the soup’s savory spiciness perfectly. The combination creates a complete comfort food experience that satisfies on multiple sensory levels.
Taco Salad Hybrid: Serve the soup over shredded lettuce with crushed tortilla chips for a unique taco salad-soup fusion. This presentation adds freshness and crunch while creating visual appeal that elevates the everyday dish.
Meal Prep Containers: Portion the soup into individual containers for convenient grab-and-go lunches throughout the week. Add toppings fresh each day to maintain optimal texture and flavor.
Common Mistakes to Avoid
Learning from typical errors saves time and ensures consistent results. These insights help you avoid the pitfalls that can diminish your soup’s quality and enjoyment.
- Not Draining Beans and Corn: Excess liquid from canned goods dilutes flavor and creates a watery soup. Always drain and rinse beans to remove excess sodium and starchy liquid that clouds the broth.
- Overcooking After Adding Ingredients: Extended cooking breaks down vegetables and beans into mush, destroying textural interest. The 20-25 minute simmer time is optimal for flavor development without ingredient degradation.
- Using Low-Quality Taco Seasoning: Commercial seasoning packets vary dramatically in quality. Read labels carefully, avoiding those with excessive fillers, MSG, or artificial ingredients that create chemical aftertastes.
- Skipping the Browning Step: Properly browning meat develops deep, complex flavors through the Maillard reaction. Rushing this step results in gray, boiled-tasting meat that lacks the savory depth that makes this soup exceptional.
- Adding Toppings Too Early: Cheese, sour cream, and chips should be added just before serving. Premature addition causes cheese to become stringy, sour cream to separate, and chips to become soggy, diminishing the eating experience.
- Insufficient Seasoning: Canned ingredients and broth contain varying sodium levels. Always taste before serving and adjust seasoning accordingly. Under-seasoned soup tastes flat regardless of quality ingredients.
Storing Tips for the Recipe
Proper storage extends your soup’s life while maintaining safety and quality. These practical guidelines help you maximize freshness and minimize food waste effectively.
Refrigeration: Allow the soup to cool to room temperature before transferring to airtight containers. Store in the refrigerator for up to 4-5 days. The flavors actually improve after 24 hours as ingredients continue melding, making leftovers even more delicious than the first serving.
Freezing: This soup freezes exceptionally well for up to 3 months. Use freezer-safe containers or heavy-duty freezer bags, leaving one inch of headspace for expansion. Label with the date and contents for easy identification later.
Thawing: Transfer frozen soup to the refrigerator 24 hours before needed for gradual, safe thawing. Alternatively, reheat directly from frozen over low heat, stirring frequently to prevent scorching as it melts.
Reheating: Warm refrigerated soup over medium heat on the stovetop, stirring occasionally until heated through. Microwave individual portions in 90-second intervals, stirring between heating cycles for even temperature distribution. Add a splash of broth if the soup has thickened during storage.
Storing Toppings Separately: Never store soup with toppings already added. Keep cheese, sour cream, chips, and fresh ingredients separate, adding them only when serving. This prevents so